

Like I mentioned in one of my previous articles, I started to think about using React with Phaser when I discovered that this HTML5 Game Engine is not very advanced regarding the utilities for building user interfaces.
Only later, I discovered that in order to stick with a "Phaser-only" approach I could have used an external plugin, called RexUI, which is specifically crafted for Phaser and it has ton of UI utilities (like dialog/textbox, tabs table, pop up menu, etc).
For the time being, I was already into this experiment about mixing Phaser and React, so here is how I dealt with it.
Premise: since this tutorial is not a "Getting started with", I assume the reader is a bit familiar with all of the mentioned technologies (Phaser, React and Redux). In case you are not familiar yet with Phaser, I suggest you give this article a read to have a basic idea about it.
First challenge: hierarchy
One of the first things that I tried to figure it out was about the "hierarchy" between these 2 libraries, and how to structure the project around them. So, I spent some time doing tests and research in order to figure out how to juggle between React and Phaser, here are my findings.
Phaser wrapping React
For example, I saw on this repo an approach that has React wrapped in a Phaser scene. To be precise, it was created a React component (which was also the React root) inside the Phaser scene file (mainScene.tsx), and attached it to the DOM using the 'react-dom' render function (in a similar way a standard React app is loaded).
At the Phaser mainScene creation time (create method) and then at every window resize event, a bit of logic is run in order to scale both Phaser and then React (it just copies the style from the canvas to the react div root). The Phaser canvas is scaled manually, so it was provided the value Phaser.Scale.NONE to "scale.mode" in the Phaser config object (more details in the next sections).
This solution is working, but I was not happy with the React set up, it seems to be too hacky to me, and I saw some potential issues with the React development.
Moreover, it was not using any already available Phaser feature to handle the canvas size ("scale.mode" and other options available in the Phaser config object).
I was not convinced. So, I kept investigating other possible solutions.
React wrapping Phaser
After some other tests and researches, I arrived to the conclusion the best approach would be to wrap the Phaser app within React, basically the opposite of what I described in the previous section. In order to do that, I followed the normal approach of creating a React app (using the Typescript template):
npx create-react-app my-app --template typescript
Then I added the following React component (called PhaserRoot ) as a child of the root, and I created the Phaser game instance inside a useEffect hook:
const PhaserRoot = () => {
    // Component centralized reference to the phaser instance if needed.
    const [phaser, setPhaser] = useState<Phaser.Game>();

    // Create a new Phaser.Game instance after the initial render.
    useEffect(() => {
        let _phaser = new Phaser.Game({
            type: Phaser.AUTO,
            scale: {
                mode: Phaser.Scale.FIT,
                autoCenter: Phaser.Scale.CENTER_BOTH,
                parent: "phaser-parent",
                width: 1920,
                height: 1080
            },
            backgroundColor: '#ffd13b',
            scene: [playGame],
        });
        setPhaser(_phaser);
    }, []);

    return <div id="phaser-parent"></div>
}
As easy as that. Now you have a Phaser game inside your React app!
Second challenge: viewport size matching
The second challenge I faced was about matching the game-viewport resolution between Phaser and React. This required a bit more effort than the previous task.
So, this is the hierarchy output from the previous step:
const App: React.FC = () => {
    return <PhaserRoot />;
}
Now the question is: Who is in charge of the aspect ratio and the size in general?
And the winner is... Phaser!
It's more convenient to let the game engine library deciding how to handle the game viewport, for at least a couple of reasons:
- Firstly, it is likely that you want to set up the background and the viewport of your game within the Phaser canvas, and then you will add some UI (with divs and buttons elements) on top of that with your React components. When developing a game it's fundamental to be in control of the viewport, and letting React being in charge of this could make difficult to handle this from Phaser, and since it's likely that the latter will handle stuff like world environment (with a tiled map, for example) or characters in and out of the viewport, you want to control this from Phaser. I suppose you don't want your character to disappear from the game viewport just because the user resizes the browser window, right?
- Secondly, Phaser has some ready to use set ups for handling the canvas size. A developer can easily obtain different configuration by providing to the config object the relative value for "scale.mode" (NONE, WIDTH_CONTROLS_HEIGHT, HEIGHT_CONTROLS_WIDTH, FIT, ENVELOP, RESIZE), for "scale.autoCenter" (NO_CENTER, CENTER_BOTH, CENTER_HORIZONTALLY, CENTER_VERTICALLY), and other fields (please, refer to the official docs for more details).
Phaser decides, React follows
So I need React to be able to adapt to the Phaser changes, and here is how I did it.
export const ReactRoot: React.FC<StatsUIProps> = ({ children }) => {
  const [rootStyle, setRootStyle] = useState({});
  const uiRootRef = useRef<HTMLDivElement>(null);

  useEffect(() => {
    const phaserParent = document.getElementById("phaser-parent");
    const copySize = () => {
      window.setTimeout(() => {
        if (phaserParent) {
          const phaserCanvas = phaserParent.getElementsByTagName("canvas")[0];
          if (phaserCanvas && uiRootRef.current) {
            setRootStyle((prev) => ({
              ...prev,
              marginLeft: phaserCanvas.style.marginLeft,
              marginTop: phaserCanvas.style.marginTop,
              height: phaserCanvas.style.height,
              width: phaserCanvas.style.width
            }));
          }
        }
      }, 0);
    };
    window.addEventListener("resize", copySize);
    copySize();
    return () => {
      window.removeEventListener("resize", copySize)
    }
  }, []);

  return <div className="react-root" ref={uiRootRef} style={rootStyle}>{children}</div>;
};
As you can see, I copy the Phaser canvas style to my "react-root" div, in a similar way it was done by the "Phaser wraps React" approach.
Before proceeding, please take a quick look again at the PhaserRoot component: the config object provided to Phaser.Game contains the field "scale.mode" and it's set to "Phaser.Scale.FIT" (which means that the canvas will try to fit the aspect ratio of scale.width and scale.height within the current window).
By using the Phaser.Scale.FIT configuration, Phaser self regulates the canvas size at creation time, and then, at every window resize. So, even if the user resizes the browser window, Phaser will resize the canvas according to the window size and the policy provided in the config object.
Once a resize event happens, we wait for the next frame (that's why the logic is wrapped inside a setTimeout with waiting time 0), so we are sure Phaser completed to apply its changes to the canvas, and then we copy the canvas style to the "react-root" div.
The ReactRoot component is going to be a sibling of the PhaserRoot component, and in order to have them (literally) on the same page I also added an extra layer (div "app-root") above them.
const App: React.FC = () => {
    return (
            <div className="app-root">
                <ReactRoot>
                    <ReactPlaceholder />
                </ReactRoot>
                <PhaserRoot />
            </div>
    );
}
The "app-root" div has a single purpose: enable whatever is contained to (potentially) use the full window size:
.app-root {
    height: 100vh;
    width: 100vw;
}
As a final touch, in order to remove any other "potential noise", I also changed the default html body values of margin and padding to zero.
body {
    margin: 0;
    padding: 0;
}
Not a solution for every type of UI
This is a bit off-topic from the main purpose of this article, but it should help the reader to be more aware about some limitations of this approach.
In general, in game development, there are essentially 2 types of user interfaces:
- Viewport UI;
- In-world UI.
This topic is one of the first ones you will face while doing game development, and basically it's all about reference systems. Here, I will try to simplify things, so you can understand my reasoning even if you are not fully familiar with this concept yet.
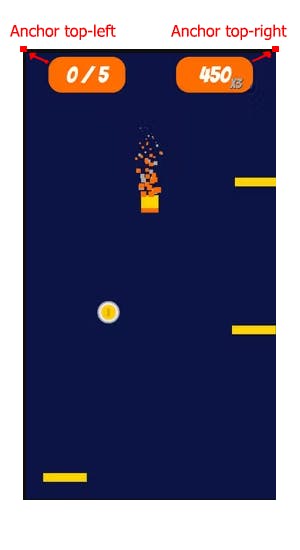
A typical example of viewport UI is the one showing some current game status info, like amount of lives, or the amount of points, etc. The position of this type of UI is usually static, typically sticking to one of the four screen's corners. Some Game Engine (like Unity) uses the concept of "anchors" to name the reference point of a UI piece.
An example would be the following, where the UIs are fixed to the top-left and top-right points at the corners (see in the below image: the red little squares are the anchors, the red arrows are the relationship between the UI and the relative anchor).
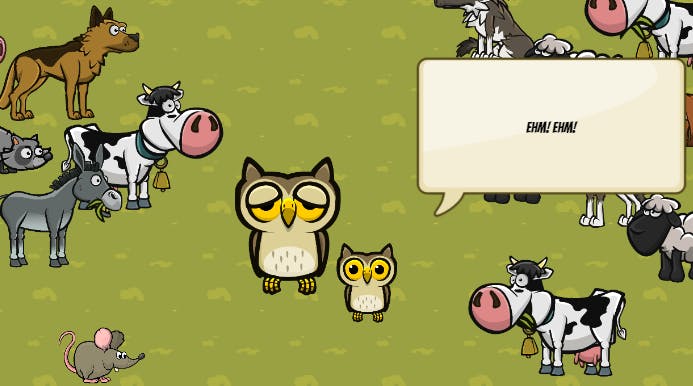
On the other hand, an in-world UI is a piece of graphic that is not fixed to the viewport; it is dynamic and it can float around based on the current status of the game.
For example, referring to the below image, the dialog cloud pointing to the little owl can be considered an in-world UI. Why? Because the cloud's anchor is not a fixed point on the screen, but it's the owl itself, which could move and change position during the game walkthrough, maybe because the owl moves inside the scene or maybe because the camera moves and targets the scene in different ways. Nevertheless, we still want the cloud sticking to the owl, right?
But moving whatever we got in Phaser (which is inside the canvas) does not have any direct effect (and meaning) to the React components, since they are on 2 different layers and they rely on two different reference systems.
Without going too much in details, I just want to say that implementing an in-world UI with React (with this set up) could be a bit more complex than creating a simple "static" React viewport UI or than programming a in-world UI directly with Phaser.
This is because the Phaser world coordinates are not "immediately available" in React, and it needs some logic to do the mapping between these 2, which is pretty feasible in the end, but it depends on the use case.
So, keep this in mind: if you plan to put a lot of in-world UIs within your game, maybe you should consider to use the already mentioned RexUI Phaser plugin instead of React components.
Third challenge: communication between libraries
Now I have both Phaser and React properly aligned, but I need one last thing: how will they communicate?
Despite Phaser has its own event system, I immediately went for Redux, since it's well tested with React (especially thanks to the library react-redux), and its performance are pretty nice.
So, I just included it in the project and added a Provider as the new root of App.tsx.
const App: React.FC = () => {
    return (
        <Provider store={store}>
            <div className="app-root">
                <ReactRoot>
                    <ReactPlaceholder /> // spoiler
                </ReactRoot>
                <PhaserRoot />
            </div>
        </Provider>
    );
}
This is a preview of my Phaser + React + Redux template:
Here I highlight the Phaser (canvas) container with a yellow background, and the React (div) container with a black border and no background (so, it will show what's behind, which is the yellow plain background from the canvas). The latter has a smaller size than canvas' one just because I added a padding, otherwise they will match perfectly.
As placeholder logic, I added 2 buttons (one with React and one with Phaser) in order to turn on/off the background music. The buttons are coordinated, and that logic is done with Redux.
Here is the ReactPlaceholder component:
const ReactPlaceholder: React.FC = () => {
    const appSettings = useAppSelector(state => state.appSettings);
    const dispatch = useAppDispatch();
    return (
        <div className="react-parent">
            <div className="react-content">
                <div className="html-root-tag">React Container (padding: 5%)</div>
                <div>React Button</div>
                <button
                    className='music-toggler'
                    onClick={() => { dispatch(setMusic(!appSettings.musicOn)) }}
                >
                    {`Sound ${appSettings.musicOn ? 'On' : 'Off'}`}
                </button>
            </div>
        </div>
    )
}
And here is the Phaser scene:
class playGame extends Phaser.Scene {
  private musicButtonOn!: Phaser.GameObjects.Sprite;
  private musicButtonOff!: Phaser.GameObjects.Sprite;
  private bgMusic!: Phaser.Sound.WebAudioSound;

  constructor() {
    super("PlayGame");
  }
  preload() {
    this.load.image("logo", logoImg);
    this.load.image("sound-on", MusicOn);
    this.load.image("sound-off", MusicOff);
    this.load.audio("bgMusic", riseShine);
  }
  create() {
    const centerW = 1920 / 2;
    const centerH = 1080 / 2;

    this.add.text(centerW - 120, 800, "Phaser button", { fontSize: "30px", color: "blue", align: "left" });
    this.add.text(0, 0, "Phaser/Canvas root (yellow bg)", { fontSize: "30px", color: "blue", align: "left" });

    const logo = this.add.image(centerW, 150, "logo");

    this.musicButtonOn = this.add.sprite(centerW, 700, "sound-on").setInteractive();
    this.musicButtonOff = this.add.sprite(centerW, 700, "sound-off").setVisible(false);

    this.musicButtonOn.on("pointerup", this.onMusicOff, this);
    this.musicButtonOff.on("pointerup", this.onMusicOn, this);

    this.bgMusic = this.game.sound.add("bgMusic") as Phaser.Sound.WebAudioSound;
    this.bgMusic.setVolume(0.1);
    this.bgMusic.setLoop(true);

    this.bgMusic.play();

    store.subscribe(this.onStoreChange.bind(this))

    this.tweens.add({
      targets: logo,
      y: centerH,
      duration: 2000,
      ease: "Power2",
      yoyo: true,
      loop: -1
    });
  }
  onStoreChange(){
    const state = store.getState();
    if(state.appSettings.musicOn && this.musicButtonOff.visible){
      this.onMusicOn();
    } else if(!state.appSettings.musicOn && this.musicButtonOn.visible){
      this.onMusicOff();
    }
  }
  onMusicOff() {
    this.bgMusic.setVolume(0);
    this.musicButtonOn.setVisible(false);
    this.musicButtonOn.disableInteractive();
    this.musicButtonOff.setInteractive();
    this.musicButtonOff.setVisible(true);

    store.dispatch(setMusic(false));

  }
  onMusicOn() {
    this.bgMusic.setVolume(0.1);
    this.musicButtonOff.setVisible(false);
    this.musicButtonOff.disableInteractive();
    this.musicButtonOn.setInteractive();
    this.musicButtonOn.setVisible(true);

    store.dispatch(setMusic(true));
  }
}
Conclusion
I hope I gave you a good overview about what is possible to do using Phaser with React and Redux, and how it is convenient to blend them altogether.
To wrap up the today's article, these are the key points:
- For a easier use, it's better to integrate Phaser into React, spawning the Phaser instance within a useEffect hook;
- Having 2 layers (one from the Phaser canvas, and the other as rest of the DOM created with React), it's likely that your game will need these layers to be perfectly aligned with each other. One possible approach to address this issue is to let Phaser decides about the game viewport size and then copy the canvas size to the React div root;
- Once React and Phaser are on the "same page", Redux comes in handy to fulfill the communication gap between the 2 libraries;
- This setup may not be the best for some scenarios. If a game has a lot of dynamic user interface (which moves around the screen based on some info coming from Phaser reference system), you could consider other options instead of integrating React, like using the RexUI plugin, which will let you handle everything within Phaser.
Do you agree with my solutions? Do you follow a different approach? Please let me know your opinion by leaving a comment below!
You can find the whole code base that I used for this article at this repository.